A department in Oregon was on the news for a rescue they accomplished when they rescued a kid who fell 50′ down a cliff while trying to retrieve a cell phone (thank goodness for job security). In the video footage win the link below, you can briefly see the setup they used during the actual rescue. The Fire Chief also took the opportunity of the news interview to have his guys using an Arizona Vortex at ground level for some good public education. Nicely done!
If you are interested in upping your game on how to use the Arizona Vortex, we still have a few spots available for our Oct. 19 and 20 Modern Technologies in Rope Rescue class. HERE
Thank you to everybody for all of the interest! After filling up all of the spots in our first class in record time, we opened up a second class right after the first one. That class has now filled, too! Keep an eye out on the website for our upcoming classes. We will most likely have the next one in March. You can sign up for our mailing list in the column on the righthand side of the web page.
After many months and many requests, we are once again offering open enrollment for our popular Modern Technologies in Rope Rescue class. Come join us in Lancaster, PA on Oct 17 and 18 to learn how much more efficient your rescues can be with a few pieces of modern gear and a whole lot of practical applications learned from real world experiences. Here is your chance to keep up on the latest equipment and trends in the rope rescue world.
After filling up the Oct 17, 18 class in record 5 days (!!!) we have decided to run a second class the following 2 days. The registration is currently open for the Oct 19, 20 class. The link at the bottom of this page will register you for the second class.
Topics this time around include:
Use of the AZTEK kit to pass knots, perform a pickoff, basket attending, and a whole lot more.
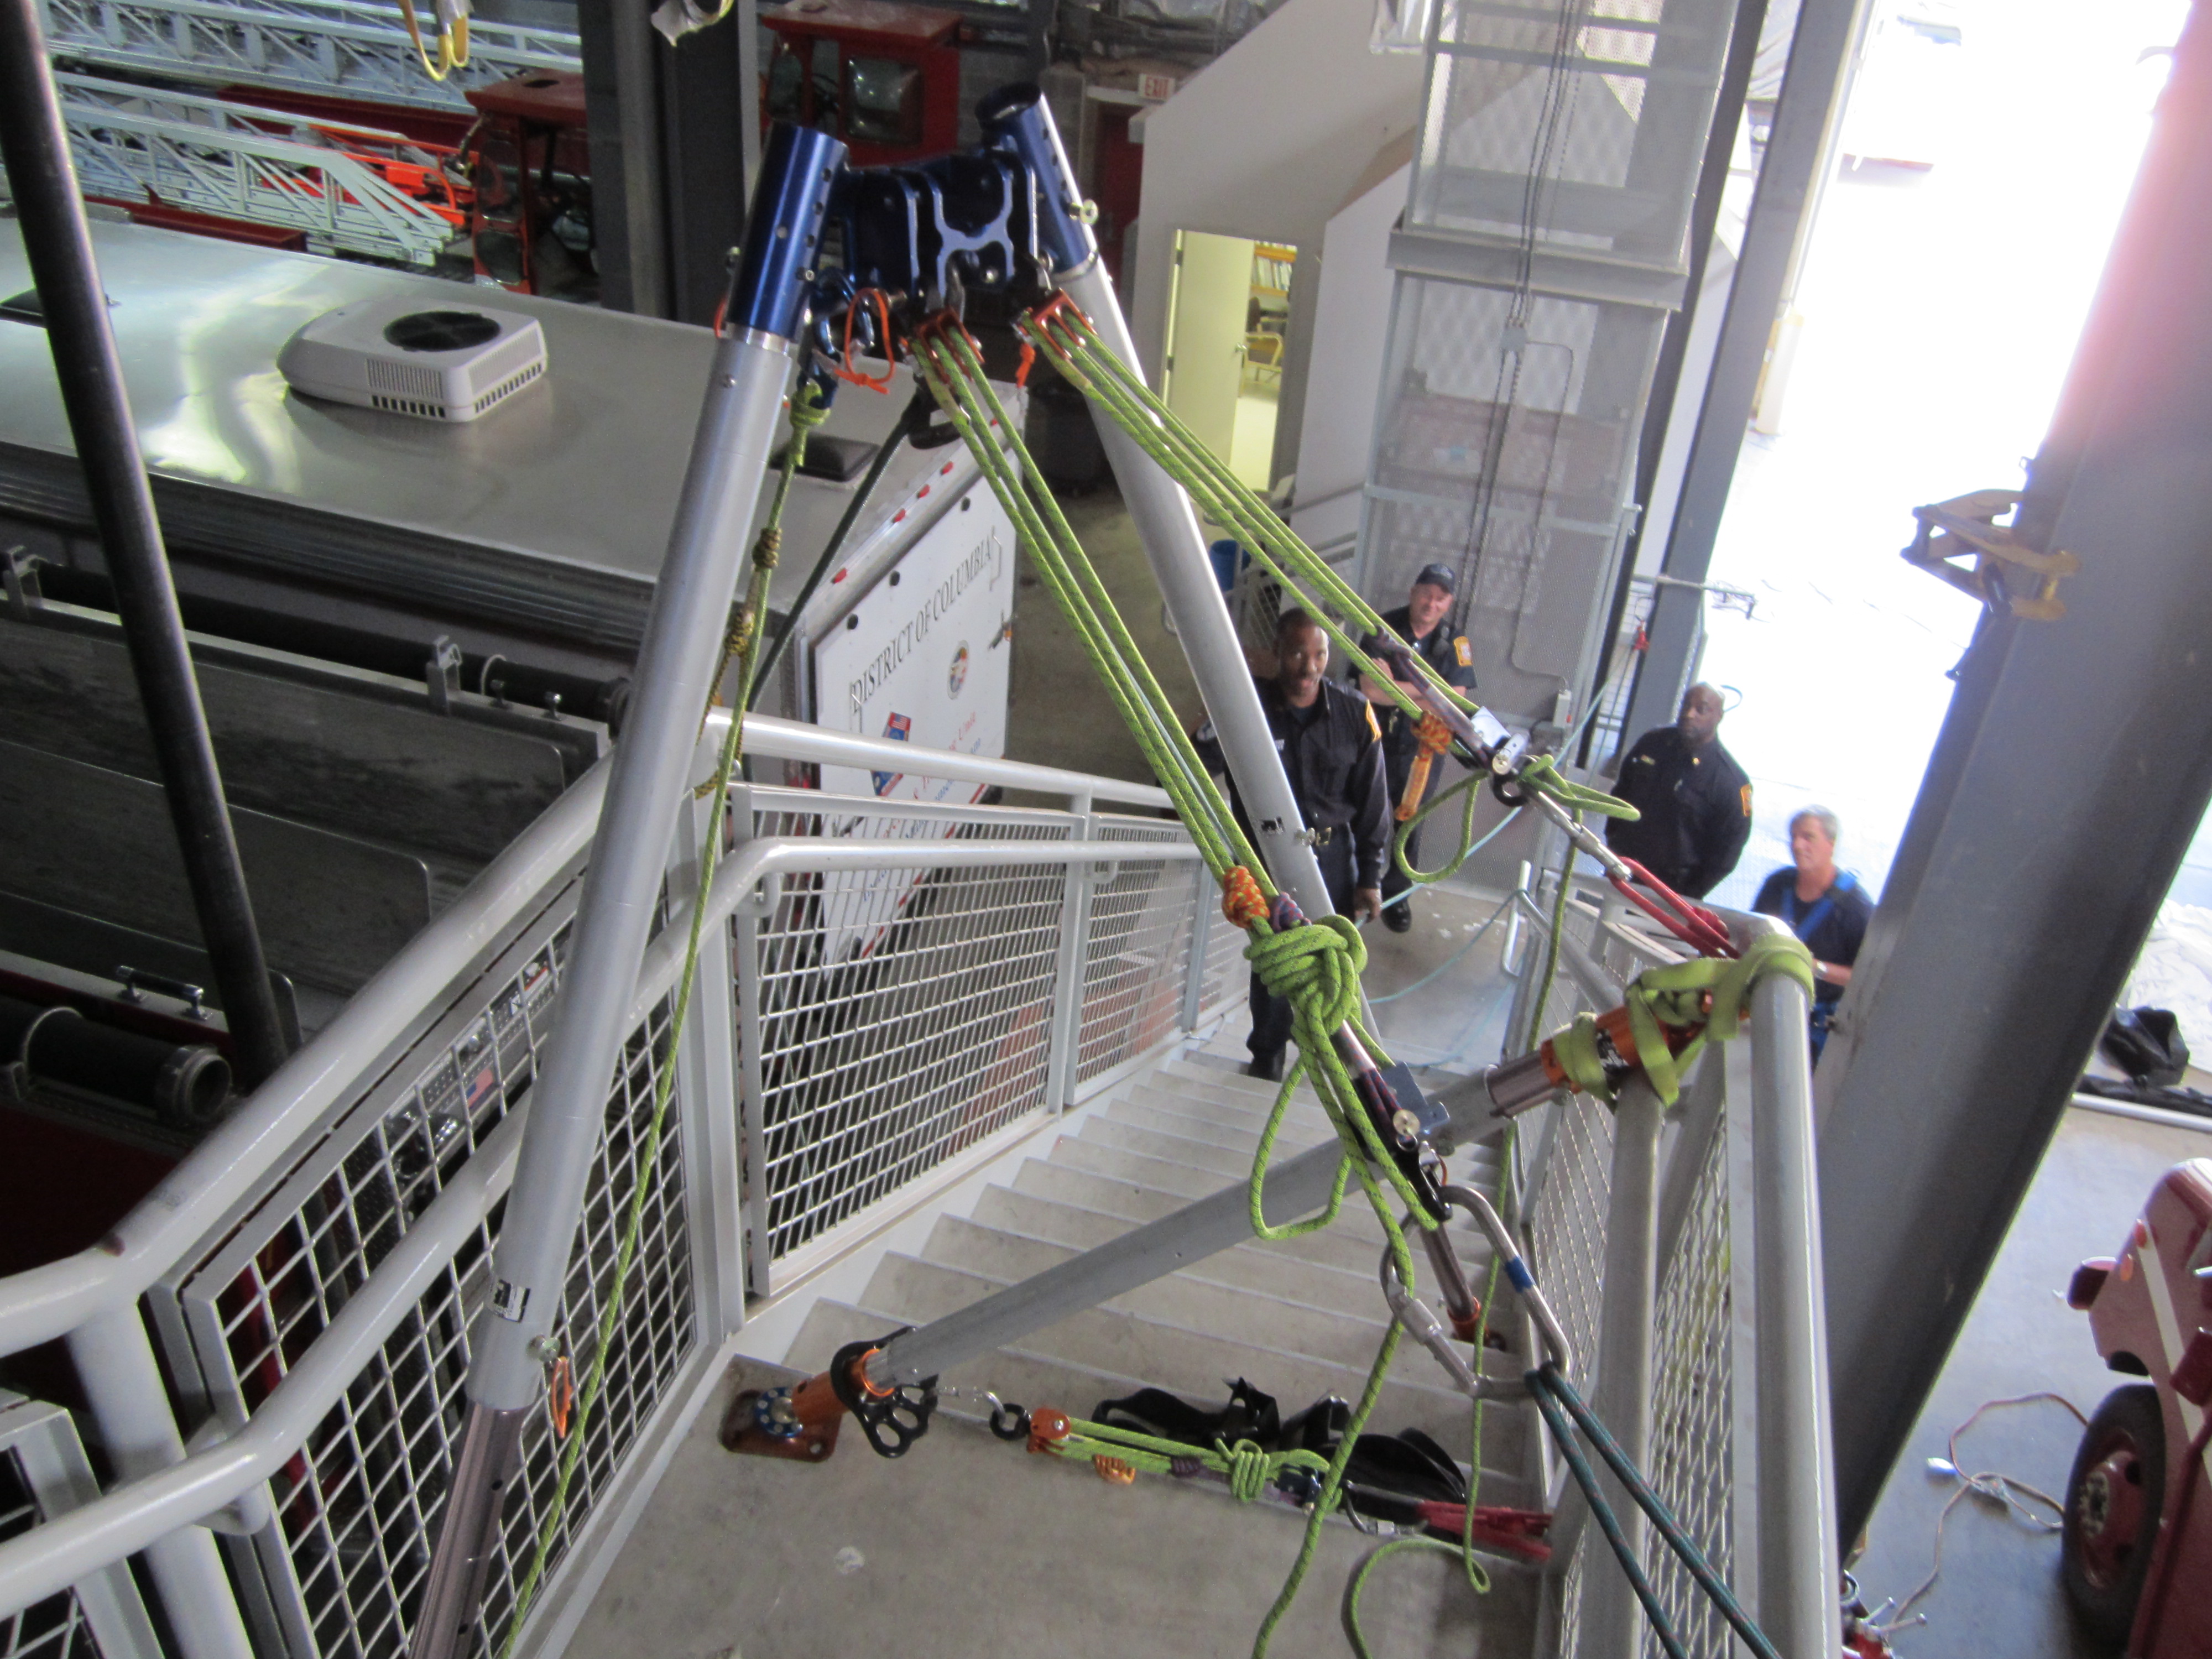
In depth discussion and use of the Two Tension Rope System utilizing the MPD.
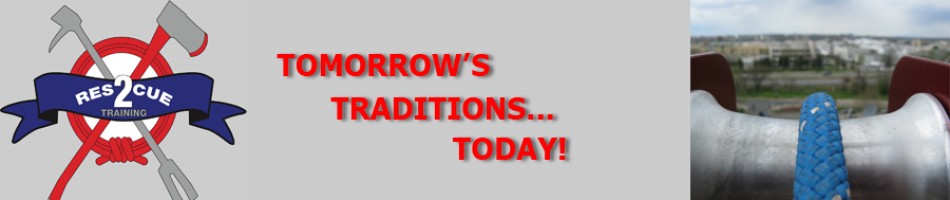
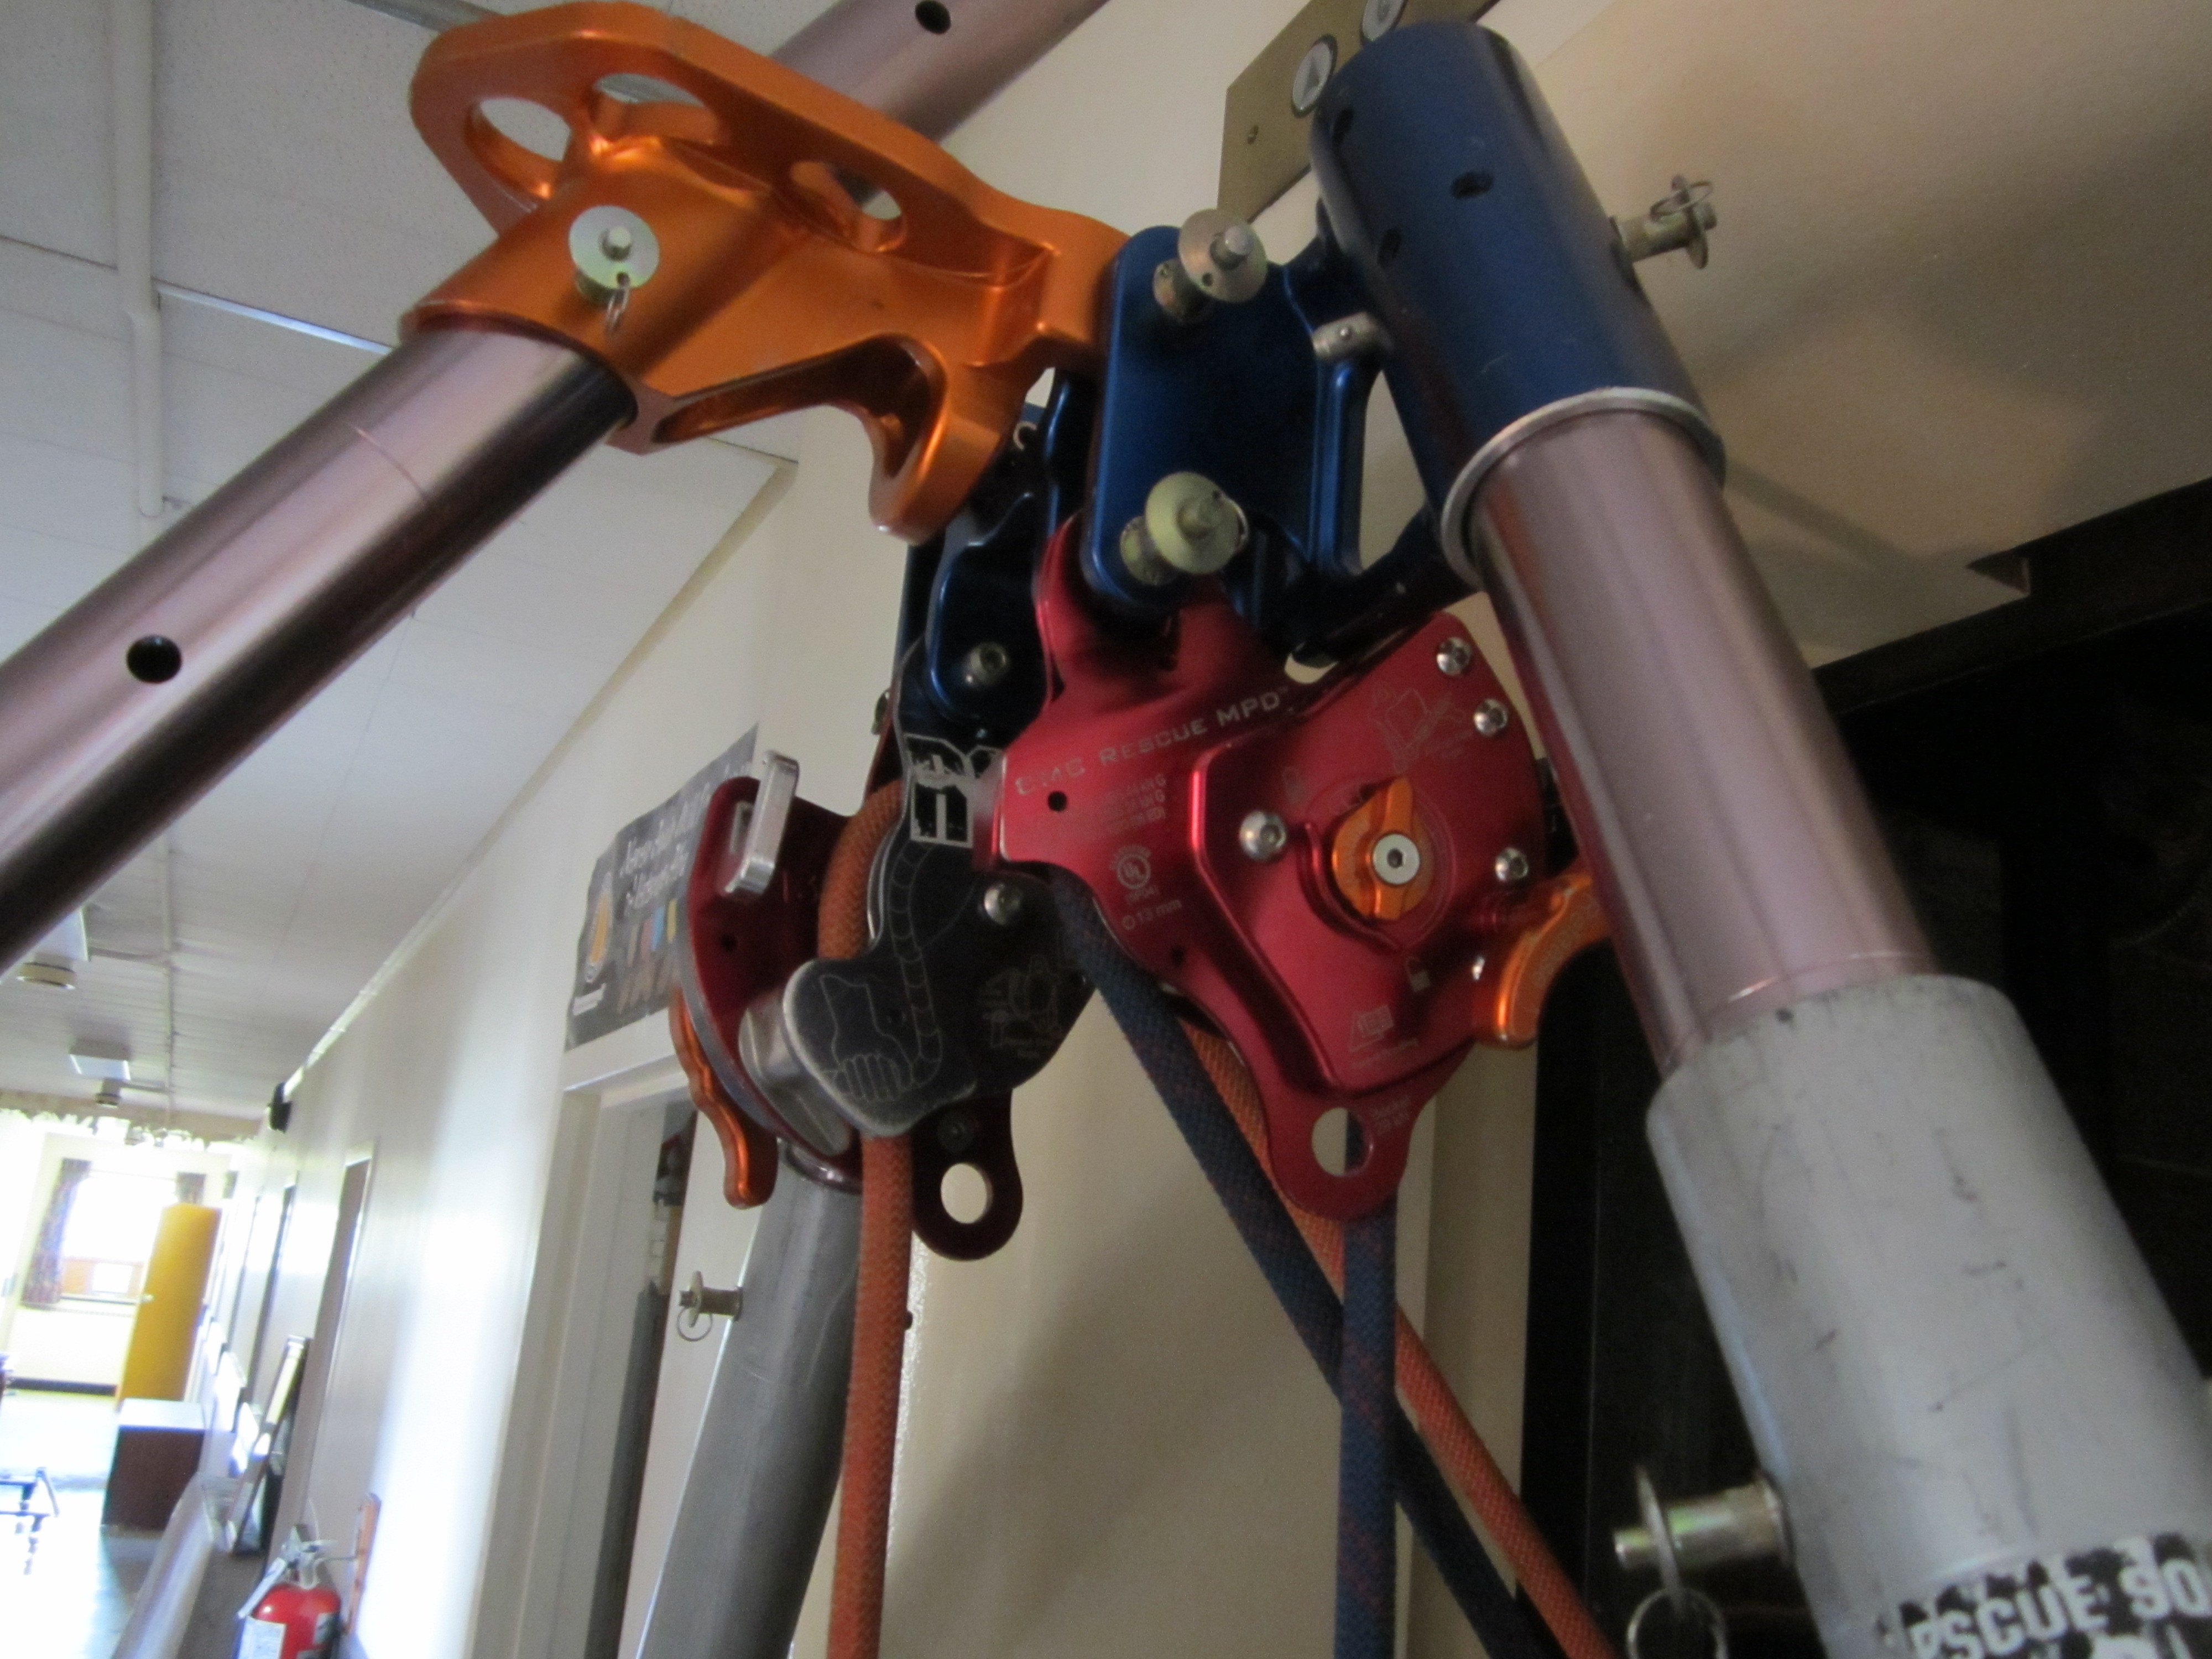
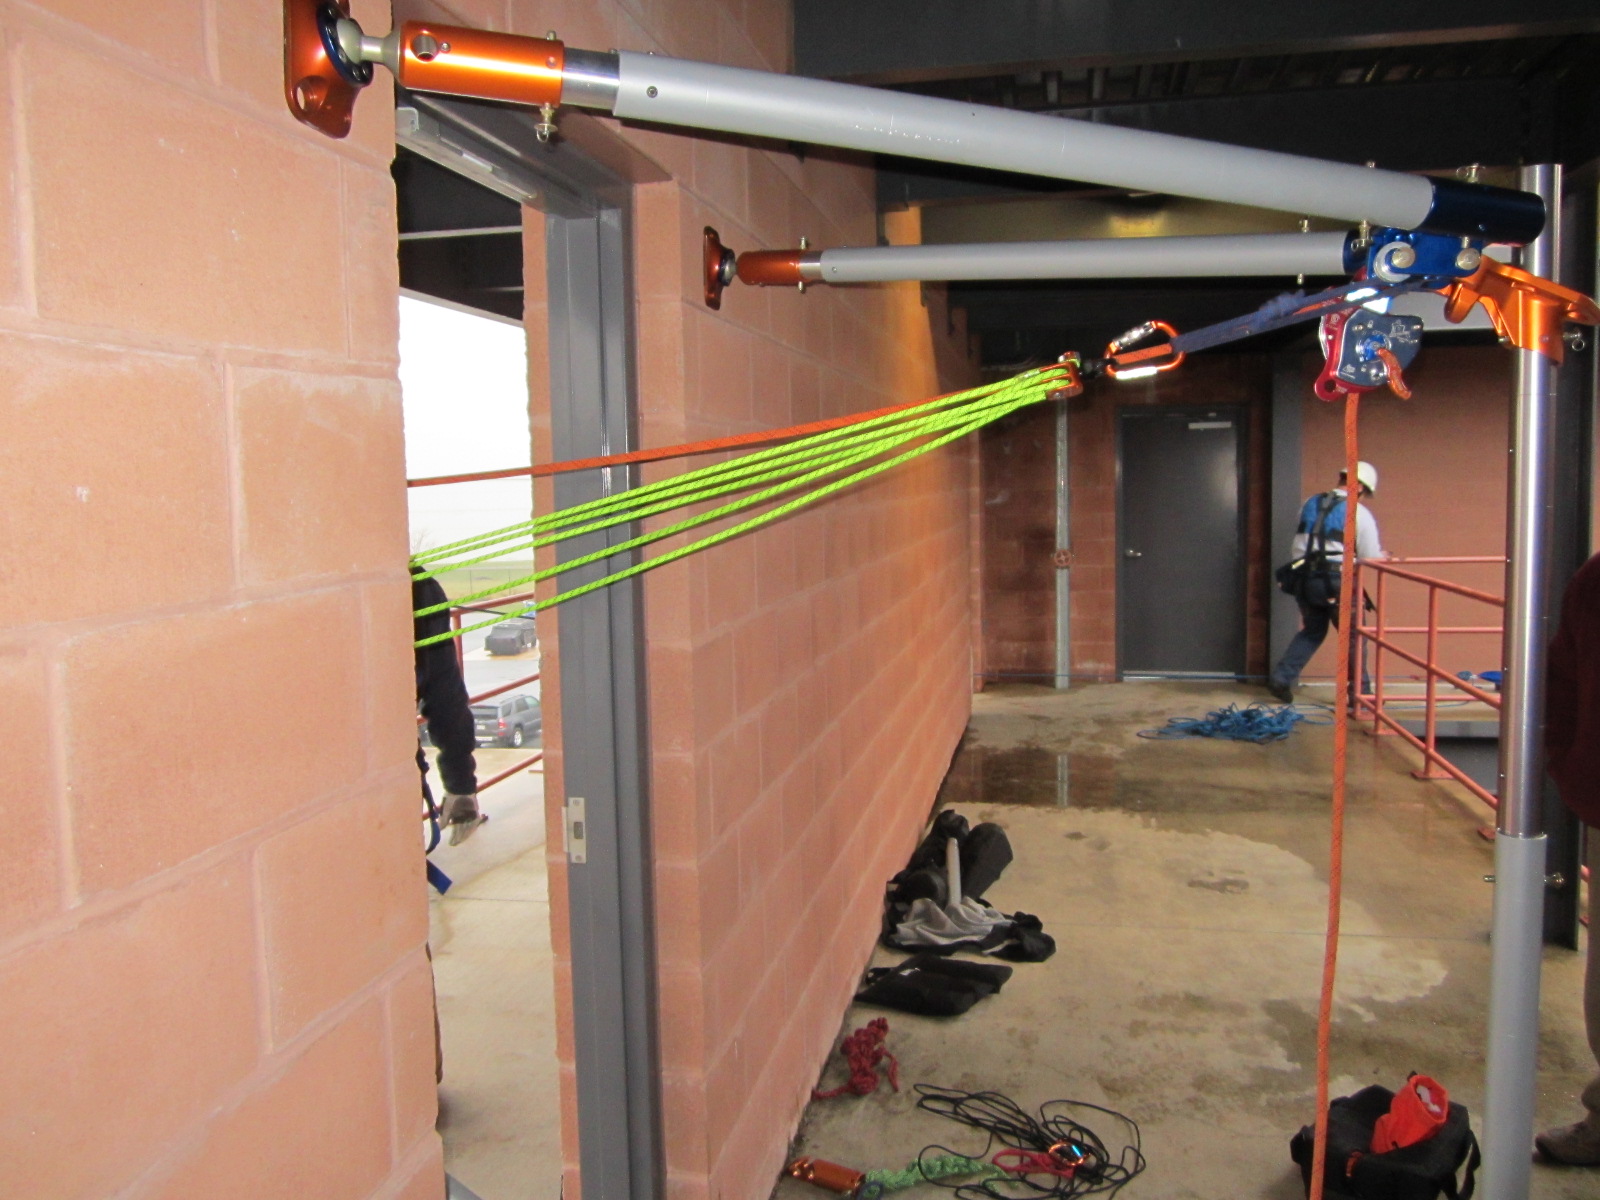
Use of the Arizona Vortex high directional in the urban environment.
The Rescue 2 Training original: The Appalachian Doortex! For urban anchoring and elevator rescue. High Directional? Anchor? Both!?… Come find out!
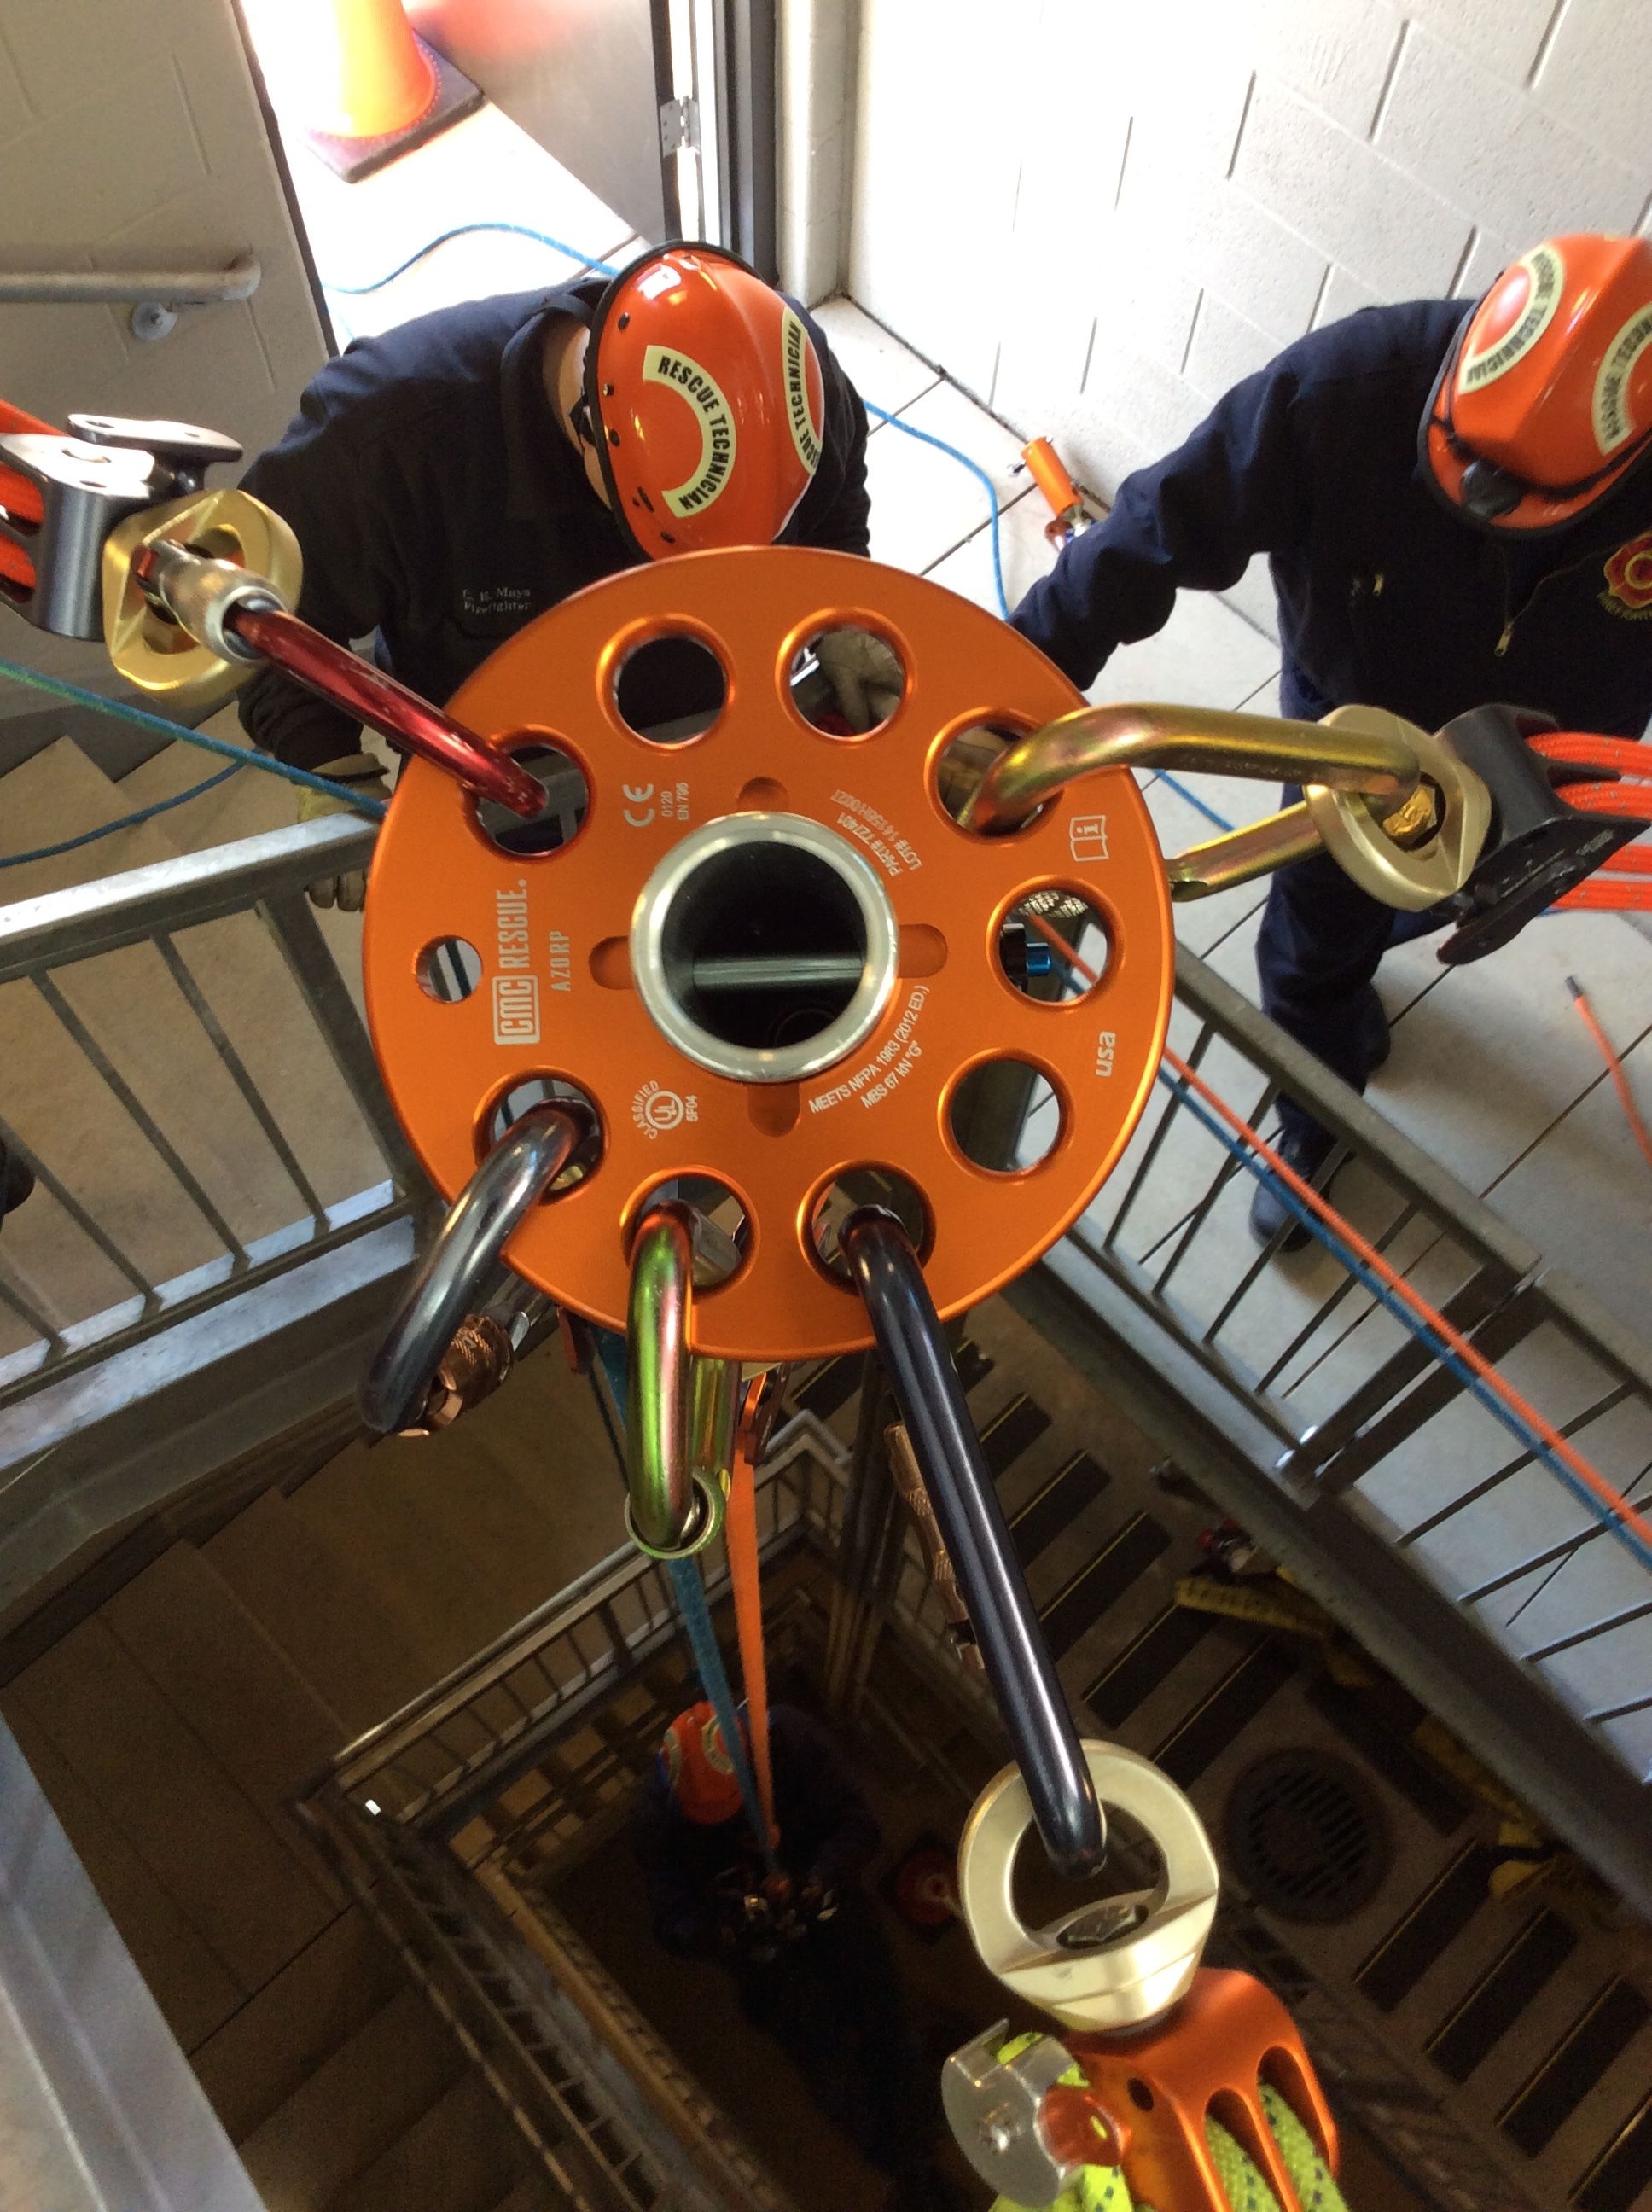
3 dimensional anchoring with the UFO.
The Skyhook capstan winch.
…And much more.
The cost of this two day, 16 hour class is $295 per person. Just bring a harness, helmet, and any ideas or equipment you would like to see used.
Please contact Kelly Byrne at 240-462-6610 or kelly@rescue2training.com with any questions.
Take a look at the first video in the link below. It’s a news story out of Fort Wayne, IN that I assume was supposed to be a simple feel good piece highlighting the local rope rescue team. If you want to jump right to the good stuff, go to the 2:10 mark in the video. What you will see is a really big, really expensive mousetrap.
I do feel a little bit bad about Monday morning quarterbacking this video… but not enough to cause me not to do it.
First, the critical point at the Kootenay Carriage. It would appear that there are two track lines, and two upper control lines (although no lower control lines) with tails going down to the rescuer and victim. The Kootenay, however, remains a critical point. Do I think it will fail? No. But we rig for failure caused by human factors, not equipment factors. Should that Kootenay fail though, the basket could take a major and possibly fatal swing fall.
Second, there is difficulty with attempting to get the basket back up over the edge after they took a ride down and back up the track lines. The reason given in the report is that the “ropes stretched”. While I don’t doubt they stretched, take a look at the link the news story below the youtube video. The second video is extra footage they got while doing the shoot. It is obvious from watching it that they were going to have this problem. While initially loading the basket over the edge you can see how far it drops down when it is initially loaded. It’s about the same distance that they are below the edge when they come back up.
Rope stretch? Maybe. Foreseeable problem? More likely. I’m curious if the attendant could have stood on the end of the basket in order to raise the head up and over the edge. Also a factor is the excessively tall bridle they use. Judging by the video, I’m guessing from the bottom of the basket to the top of the carriage to be six feet in height.
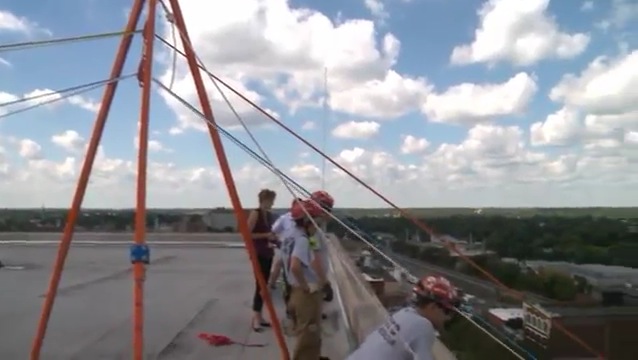
Third, you can see from this picture just how close the resultant is to being outside of the footprint of the tripod. When the track lines were tensioned to raise the load, I’m curious if the friction in the pulleys caused them to temporarily move the resultant until they found their center again.
Fourth, two statements made during this gave me a bit of heartburn. The first is that the “white rope didn’t work the way it was supposed to.” Ropes work exactly as they are rigged. Unless it broke under tension due to unseeable chemical degradation, it was rigging failure. It’s hard to tell what the white lines were rigged to, but I’m guessing they got pulled up off of whatever they were on. The second statement is that “nobody was dropped…they were lowered”. If it was unexpected and uncontrolled, it was a drop. Maybe I would have been inclined to say the same thing out of embarrassment while on camera, but lets call it what it is.
Last, neither the reporter in the basket, nor the one on the roof seen just before the tripod topples, have a helmet on. If I were running this show, it probably would have been an afterthought for me too. Having seen this video, I’d be willing to bet it would be a fatal blow if a tripod toppling like that hits you in the head, helmet or not.
I do applaud Ft. Wayne TRT for allowing this to air (if in fact they had a choice). It’s sometimes hard to admit a goof up. It’s even harder to have it on tape for guys to critique from a distance without knowing the full circumstances (me). The least we can do is try to learn from it.
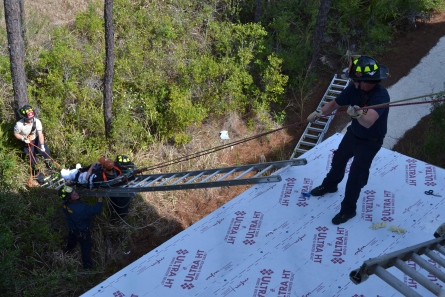
The recent rescue by the South Walton Fire District’s Technical Rescue team in Florida is a great example of rescue where it is easy to access the victim by something as simple as a ladder, but where a rope based system might still be the best alternative for getting them down to the ground safely.
You can see in the pictures that the guys on the ground are able to guide the basket most of the way to the ground while it is supported on the ladder and being lowered with rope.
Two quick points: If possible, I would have tried to line up my ladder with my anchors so that it was all in plumb. Maybe there is a good reason they didn’t. It’s hard to tell from just a picture. Secondly, you can see how easily they overcame this by just having a rescuer on the roof do a very minor deflection by just pulling on the rope. It’s a good example of knowing how to easily overcome a problem by knowing a few physics tricks.
Not all rope calls are high pucker factor incidents of life and death. Sometimes it’s just the simplest way of getting the patient to the ground. Good job, guys.
While I’d love to start the year on a high note, this video of a rope rescue demonstration brought out the Debbie Downer in me. How many rope rescue guys does it take t screw in a light bulb? Answer: 7. One to screw it in and 6 to point out how he could have done it better and more safely.
With that in mind, I’d like to talk about the video below. There are a few things that jump out at me:
Firefighting gear isn’t technical rescue gear. I’d argue you are better off with the increased flexibility of your station uniform. The brim on the back of a firefighting helmet is great at keeping water and junk from falling down the back of your coat at a fire; it’s also great at hanging up on rope, railings, and everything else at a rope call.
While there are several examples of a worse edge transition, this one was successful, but had the potential for disaster. The mainline system was run under the fencing and the basket was placed over it. This created the potential for a pretty big drop. A belay line did not appear to be in place until the rescuer climbed over the fence.
There was no obvious edge protection for the main line. If the basket had dropped prior to the attachment of the belay line, it would have taken a pretty substantial fall on an unprotected edge.
The belay line was not along the same plane as the main line. If the belay line were to be needed, there would have been significant horizontal movement.
If using webbing to help lower a basket over the edge, consider wrapping a Munter (Italian) hitch around the railing rather than strong arming it.
A high directional would have solved most of these problems. Even just going over the fence would have helped quite a bit. To reinforce the fence and keep it from collapsing back towards the anchor due to the resultant, a reinforcing strut could be put into place pretty quickly. Like this:
I don’t mean drilling as in training ( I’m sure that’ll be another post), but drilling as in: taking out a drill and putting a hole in a wall to make an anchor point. It’s just not something that I’ve heard talked about in the fire service rope rescue community as a viable option for anchoring. I’m not sure why though.
We’re pretty comfortable putting holes in roofs, breaking windows, forcing doors, etc… We might even be comfortable drilling holes for anchors in a building collapse situation in order to lift a slab of concrete. Bet when it comes to rope rescue; No Way! Maybe that will change in the future.
Looking at bolting initially, I was surprised by how relatively simple and quick it is to do. There is no voodoo knowledge or ninja rope skills required. The key points are to drill to the correct depth, far enough away from an edge, and to get the dust out of the hole before inserting the bolt. All of that information is available from the bolt manufacturer. In the video below, I’m using a 1/2″ diameter 3 1/2″ length Hilti KB3 rated at over 6000 pounds of pullout force. The Fixe hanger is rated to over 6000 lbs as well. Those aren’t bad numbers. Drop in a couple of more for your system and you have a pretty bomber system with very little effort. Before, a blank concrete slab was a thing to for the urban rescuer to fear. Now, it could be looked at as something to seek out!
Keep an eye out when you walk through buildings on routine calls. Look around for the concrete columns and beams to see where you could drill. I did this and was amazed at where I now feel comfortable knowing I can set up a system.
As seen in the video below, it takes roughly two minutes to drill and clean the hole, set the bolt and hanger, and finally torque it to spec. There are some tricks to keep you from cranking on the nut too much if you don’t have a torque wrench, like using a stubby box wrench. You just can’t get the kind of leverage needed to overtighten unless you are REALLY cranking on it.
This dramatic highline failure in Lima, Peru looks like somebody tried to go bungee jumping while attached to a Stokes basket loaded with a (previously) uninjured victim.
A couple of points to note:
Just before the track line snaps, you can see the carriage kind of “chugging” along down the line, indicating that something is binding up somewhere. One thought is that the control line used to lower the rescue package down the trackline is on the downhill side of the carriage, which would cause the side cheeks of the pulley to dig into the rope until there was enough force to cause the pulley to move down the rope a bit before binding up again. Hence the chugging motion.
The tension on the trackline seems to be way too tight. While it is a sloping highline, there seems to be very little sag, which would indicate that the trackline was too tight and easily susceptible to being cut by something…like, say, a pulley that is loaded sideways.
There is no horizontal control line on the downhill side. When the basket falls, there is a substantial fall distance as well as one hell of a swing fall at the bottom of the ride. When the basket reaches the bottom of its arc, it starts to swing back up again, only to be stopped by the second floor walkway, which I’m sure did quite a number on the rope.
Had there been a lower horizontal control line, the total fall distance would most likely have been less, and the swing fall most certainly would have been all but eliminated.
Despite all of those things, the system still kept the load from hitting the ground. Not a ringing endorsement, but it does give you an idea of strong our equipment actually is.
I’d seen this video before, but Matt Hunt from Sterling Rope passed along a facebook link to it that caused me to search for a linkable version of it. Thanks for bringing it back to the forefront, Matt.
And just for kicks, here is a dramatic presentation of what happens when there is not enough sag in the system between your anchors. It’s a good showing of the load pulling the anchors towards each other:
Here are a few different rope articles to whet your kernmantle whistle for the weekend.
First up is an article from the Art of Manliness website sent to us by all around manly man and HazMat guru Jack Spencer. It showcases an exercise done in Navy BUD/S training where candidates tie knots underwater. It’s not a huge mental leap to figure out where this might be a useful process to go through: retrieving objects from under water, stabilization of vehicles in moving water, etc… If nothing else it will help break up the boredom of doing the same drill over and over again. There’s a ton of other cool things on this website that are not rope related, yet somehow are still manly.
Next up is a the way window washers SHOULD be rescued when hanging 35 floors up. The difference in the key words used to describe this incident is a pretty stark contrast to the way the FDNY described it’s window washer rescue: Professional, training, safe vs. dangerous, heroic, 45 minutes with a diamond tipped angle grinder, etc… What I’m getting at is that these types of operations are difficult to PLAN for, they are relatively easy to PREPARE for. The distinction being that you can’t know exactly where an incident like this will occur, but you can know that an incident like this will occur somewhere. Victim pick off should be a pretty straightforward option for a team that says they are capable of performing a rope rescue.
And last up is a rescue of a cliff jumper in Alabama. Not your Red Bull type extreme jumping, just a local swimming hole. It looks like a combined ground and helo based plan. As we’ve stated before, the hallmark of a good team is to have a Plan B,C, and D in place. All of those moving pieces still didn’t prevent locals from going right back to jumping though.
If you remember and appreciate our previous post of the world’s worst edge transition, here is a video of the runner up. I try not not be TOO critical of video because I wasn’t there, but there is always room for learning and improvement. Soooo…
Despite:
1. Having a high change of direction anchor at the edge
2. Having an attendant
3. And two tag lines
They still managed to get the basket hung up on the edge!
Possible fixes:
The high COD at the edge with a system behind it should have enabled the crews to do a vector pull between the anchor and the COD to raise the basket temporarily at the edge to clear obstacle.
It looks like the attendant was just going along for the ride rather than being an active attendant trying to help the basket to negotiate obstacles. While the low attendant position (legs below the basket) seems to be the most popular, I think it would be beneficial in this case, at least during the edge transition, for the attendant to ride in the high position. This is where the attendant’s legs are above the basket and below the attachment bridle. This would allow for keeping the basket away from the snags at the edge. Moving to the low attendant position after the first edge would allow the attendant to keep away from obstructions coming up from below.
Pull on the tag lines!
As a guy who loves to train, I’m reasonably sure that regular training on rope rescue techniques, regardless of equipment, could have solved many of these issues. Get out there and play!
Search
Rescue 2 Training Mailing List
Sign up here for our mailing list and receive priority notice of forthcoming training opportunities and other cool stuff.